Monday, July 15, 2013

[Java] [Performance] String Concatenation then Replace or Replace then Concatenation: Which is faster?

This is something related to the java performance: answer for a where, which and what code to use problem. Let me start with introducing the problem.


When we coding java we are normally use string concatenation and string replacements in our code. But when we encounter a java based solution which need string concatenation and string replacement we never think about the order which we should execute them in ordered to  maximize the performance. So the problem here is do we need to concat first or replace string first to high performance? (Please note that this is not valid for all the cases where you need to concat and string replace)

So I thought about a method to measure the performance of in each case.

Case 1 - Concatenation then Replace
Here is the method I used to measure the performance. k is the number of concatenations.

 
    public long testConcatReplace(int k){
        long t = new Date().getTime();
        for(int j=0;j<10000;j++) {
            String str = "I am the best";
            StringBuffer s = new StringBuffer(str);
            for(int i=0;i<k;i++){
                s = s.append(s);
            }
            s.toString().replaceAll(" ", "");
        }
        return new Date().getTime() - t;
    }

Here is the average time value for executing this method for different  k values.

k time
1 11
2 25
3 42
4 60
5 148
6 231
7 565
8 1001

Case 2 - Replace then Concatenation
Here is the method I used to measure the performance. k is the number of concatenations.

Here is the average time value for executing this method for different  k values.

    
   public long testReplaceConcat(int k){
        long t = new Date().getTime();
        for(int j=0;j<10000;j++) {
            String str = "I am the best";
            StringBuffer s = new StringBuffer(str.replaceAll(" ", ""));
            for(int i=0;i<k;i++){
                s = s.append(str.replaceAll(" ", ""));
            }
        }
        return new Date().getTime() - t;
  }    

Here is the average time value for executing this method for different  k values.

k time
1 20
2 26
3 41
4 47
5 57
6 67
7 84
8 92

Here is the comparison of both results in a graph.


Observation:
String replacement is a expensive process and the time for the operation is exponentially increase with the length of the string.
Concatenation is somewhat expensive but the time consume for concatenation of any two string is almost equal.

Conclusion:
You can increase the the string replace performance of your java code by executing the string replacement before concatenation. 

Environment:
OS - Mint Linux 12
CPU - Intel(R) Core(TM) i7-2630QM CPU @ 2.00GHz
RAM - 8 GB

Sunday, June 30, 2013

WSO2 Governance Registry Checkin client - Dump Registry Resources To A File System

In WSO2 Governance Registry you can dump the registry content into a file system or a single file where you can use it to restore the registry to that SNAPSHOT. In addition to that when you dump into a file system you can do changes to it and commit. Here I am talking about how you can do it.


Dump the registry resources into a file system.
Command -
Linux : sh checkin-client.sh co https://localhost:9443/registry/ -u admin -p admin
Windows : checkin-client.bat co https://localhost:9443/registry/ -u admin -p admin

In the following content I will be describing the additional functionalities we introduced after Governance Registry version 4.5.3.

1. Add - Use of this is to add new resource in the client side. This will be reflected in the registry when committing. In earlier versions of checkin client there were no option like this and whatever we put in the checked in location will be committed. But now the resource must be add to reflect in the registry.
Command -
Linux - sh checkin-client.sh add x.xml
Windows checkin-client.bat add x.xml

If you want to specify the mediatype when adding you can follow the following commands,
Linux - sh checkin-client.sh add x.xml -mediatype application/policy+xml
Windows checkin-client.bat add x.xml -mediatype application/policy+xml

[NOTE] Though we are specifying the mediatype it won't go through the registry handlers when we committing to the registry.

2. Delete - Use of this is to delete a resource which is checked in using checkin client.  This will be reflected in the registry when committing and will not delete the local resource until then (this method is for the purpose of reverting). In earlier resource can be deleted using OS delete but in the current version it won't delete the resource in the registry untill the resource deleted using the delete command.

Command -
Linux - sh checkin-client.sh delete x.xml
Windows checkin-client.bat delete x.xml

3. Add/Update property - Using this method you can add, update a resource property. You can set any number of properties in one command as key value pairs.
Command -
Linux - sh checkin-client.sh propset x.xml property1 value1 property2 value2
Windows checkin-client.bat propset x.xml property1 value1 property2 value2

4. Delete Property - Using this command you can delete a resource property. You can delete any number of properties in one command giving key set.
Command -
Linux - sh checkin-client.sh propdelete x.xml property1 property2
Windows checkin-client.bat propdelete x.xml property1 property2

Check in the changes
Command-
Linux - sh checkin-client.sh ci -u admin -p admin
Windows - checkin-client.bat ci -u admin -p admin

[NOTE] In the current model when checkin to the registry all the resource won't restored to the registry unless there are changes in the local resources. Change in the content or property, resource add and resource delete will be consider as change of property and will only checkin those changed resources to the registry. 

There are still certain limitations which we are working on overcome them and will be fixed in next release.

Monday, June 17, 2013

Configure WSO2 API Manager to send responses to a client which does not support chunk transfer encoding

Some client applications which used the API Manager to invoke APIs may not support chunk transfer encoding and some client applications may need Content-length HTTP header for their application usage. Since by default API Manager gateway sends the response with chunk transfer encoding in either case aforementioned you need to disable the chunk transfer encoding in the response. In this post I am going to show you how to do that.
When creating an API, API Manager will automatically crate a proxy for it in the API gateway which accept the requests on behalf of the actual API. The configuration of that proxy can be found in $CARBON_HOME/repository/deployment/server/synapse-configs/default/api/${PUBLISHER}--${API_NAME}_v${API_VERSION}.xml. In my example I used a API named MovieAPI and version 1.0.0 which published by the publisher eranda and my proxy configuration file is $CARBON_HOME/repository/deployment/server/synapse-configs/default/api/eranda--MovieAPI_v1.0.0.xml
If you check the configuration you will see a configuration which similar to a ESB proxy configuration. So to make it disable the chunk transfer encoding you need to add it to the out sequence as in the following configuration.


Additionally if your backend API does not support chunk encoding you need to add aforementioned two additional properties to the inSequence.

Thursday, June 6, 2013

How to set port offset of WSO2 API Manager 1.4.0

WSO2 API Manager is a complete solution for managing API through its lifecycle, powered by WSO2 Enterprise Service Bus, WSO2 Identity Server, WSO2 Governance Registry and WSO2 Business Activity Monitor.
Today I am going to talk about changing the port offset of WSO2 API Manager. Basically my requirement here is to start two servers in the same server without clashing each other but everybody who need to have a port offset in WSO2 API Manager should follow this.


WSO2 API Manager is bit different than the other WSO2 servers from setting the offset since we it has little more work than other servers where in other WSO2 servers we only have to set the offset value in the carbon.xml. Following steps shows you how to set port offset in WSO2 API Manager.
  • Set offset in the $CARBON_HOME/repository/conf/carbon.xml to any value you want.
 
         
         2
  • Set the Thrift client and server ports in $CARBON_HOME/repository/conf/api-manager.xml to (10397 + portOffSet) as shown in below.
        

        ThriftClient
        10399
        10000
        10399
        
        true
  • This is the most valuable configurations where without this configuration API Store will never work with port offset. Now change the endpoint configuration in the following files to suit your port offset

    1. $CARBON_HOME/repository/deployment/server/synapse-configs/default/api/_LoginAPI_.xml - This configuration involves with user login to the API Store.
    2. $CARBON_HOME/repository/deployment/server/synapse-configs/default/api/_TokenAPI_.xml - This configuration involves with generating OAuth token.
    3. $CARBON_HOME/repository/deployment/server/synapse-configs/default/api/_AuthorizeAPI_.xml - This configuration involves with authorize a OAuth token.
         Here is a sample configuration for _AuthorizeAPI_.xml where my offset is 2.
<endpoint>
    <address uri="https://localhost:9445/oauth2/authorize"/>
</endpoint>
    Now you are done and your WSO2 API Manager is ready to start with the port offset.

Tuesday, May 28, 2013

ERROR 1005 (HY000): Can't create table : How to Tackle

It's bit hard to identify the referential integrity issues in MySQL InnoDB engine  by looking at the error. It just throw the error in abstract, "Can't create table". But when we altering a table or adding a table with several foreign key constraints we are more prone to do such errors. So here I am going to explain a method which can be use to identify the error without going trough all the table syntax.


It's very simple. When you executing a bad foreign key sql query InnoDB engine will automatically saved it in its activities. So what you need to do is, asking the InnoDB engine to show its activities. Here is the sql query to dump out the InnoDB engine activities. 

mysql> SHOW engine InnoDB STATUS; 

When you execute it you will get a big output. You can go through it and find a topic "LATEST FOREIGN KEY ERROR" which has a clear description for your the error. Here is a sample output, I extracted from a error I was faced.


----------------------------------------------
LATEST FOREIGN KEY ERROR
----------------------------------------------
130529  3:55:45 Error in foreign key constraint of table mydatabase/mytable:

   FOREIGN KEY (`CountryName` )
   REFERENCES `mydatabase`.`country` (`countryName` )
   ON DELETE NO ACTION
   ON UPDATE NO ACTION
) ENGINE=InnoDB DEFAULT CHARSET=utf8:
Cannot resolve table name close to:
 (`Country` )
   ON DELETE NO ACTION
   ON UPDATE NO ACTION
) ENGINE=InnoDB DEFAULT CHARSET=utf8


As in the above description say, the fault is, the InnoDB engine cannot find a table. Basically the country table which has a column countryName which reference by one of the columns in mytable table, does not exists in the database. Like wise you can get an idea about the error using the output of that command. Then you can go for a appropriate solution. 

Hope you use this for tackle your referential integrity issues. 

Sunday, May 19, 2013

Exposing JMS queue via JAX-RS Service

Today I am going to show you how to expose a JMS queue as a JAX-RS Service. Here I am using few tools for this.
  1. WSO2 Developer Studio 3.0.0
  2. WSO2 Application Server 
  3. Apache ActiveMQ
Here I am assuming that the Apache ActiveMQ up and running. You can start ActiveMQ with its management console (using the command ./activemq console) and view the queue details using from URL http://localhost:8161/admin/queues.jsp. Here is an screenshot the list of queue in my ActiveMQ server. Here I have one queue, SampleStockQuoteProvider with three messages in it.


You can view the content and other metadata of those messages by clicking the queue name. Following figure shows an example.


Now let's start with creating the JAX-RS service. Here I am using WSO2 Developer Studio where you can download from here.

Unzip the pack and start it as it is normal Eclipse IDE.
Then click on Developer Studio ---> Open Dashboard to get the Developer Studio dashboard. You can see a dashboard like below.


Now click on JAX-RS Service Project and create a project by filling the details as below.


Developer Studio will create a template project for you. Since we are going to access ActiveMQ within this service we need to add some dependencies.
To do that open the pom.xml file and add the following to the dependencies.

        <dependency>
            <groupId>org.apache.activemq</groupId>
            <artifactId>activemq-core</artifactId>
            <version>5.7.0</version>
        </dependency>
        <dependency>
            <groupId>org.apache.geronimo.specs</groupId>
            <artifactId>geronimo-jms_1.1_spec</artifactId>
            <version>1.1</version>
        </dependency>
        <dependency>
            <groupId>org.apache.ws.commons.axiom</groupId>
            <artifactId>axiom-api</artifactId>
            <version>1.2.14</version>
        </dependency>


Now we can edit the DequeueService to consume the JMS queue in Apache ActiveMQ. Following is sample java code which I wrote.

package org.wso2.carbon.sample.dequeu.rest.service;

import org.apache.activemq.ActiveMQConnectionFactory;

import javax.jms.*;
import javax.ws.rs.GET;
import javax.ws.rs.Path;
import javax.ws.rs.PathParam;
import javax.ws.rs.Produces;
import javax.ws.rs.core.MediaType;
import javax.xml.stream.XMLStreamException;

@Path("/dequeue/")
public class DequeueService {

    @GET
    @Path("{queueName}")
    @Produces(MediaType.APPLICATION_XML)
    public String dequeue(@PathParam("queueName") String queueName) throws Exception {
        System.out.println(queueName);
        Connection conn = null;
        Session session = null;
        MessageConsumer consumer = null;
        try {
            ConnectionFactory factory = new ActiveMQConnectionFactory("tcp://localhost:61616");
            conn = factory.createConnection();
            conn.start();
            session = conn.createSession(false, Session.CLIENT_ACKNOWLEDGE);
            Destination queue = session.createQueue(queueName);
            consumer = session.createConsumer(queue);
            Message message = consumer.receive(1000);

            if(message == null) {
                throw new Exception("No message available in the queue");
            }

            message.acknowledge();
            return ((TextMessage)message).getText();
        } catch (JMSException e) {
            throw new Exception("Dequeuing not succeeded" ,e);
        } catch (XMLStreamException e){
            throw new Exception("Unexpected message found in the queue", e);
        } finally {
            if (consumer != null){
                consumer.close();
            }
            if (session != null) {
                session.close();
            }
            if (conn != null) {
                conn.close();
            }
        }
    }
}
[NOTE] Here I use the return mediatype as xml since messages in the queue I am going to pull has xml content. Instead you can use any mediatype listed in javax.ws.rs.core.MediaType.

Now you can go to the project home and build it using Maven using the command mvn clean install. It will create a web archive (WAR file) in the target folder. Now we need to deploy it in a Application Server, here I am going to use the WSO2 Application Server. Before deploying it, we need to add the dependency jars. So add the following list of jars (you can find them inside the ActiveMQ library) to the $CARBON_HOME/repository/components/lib. No need to restart the Application Server, these jars will be hot deployed.
  • activemq-core-5.7.0.jar  
  • geronimo-j2ee-management_1.1_spec-1.0.1.jar  
  • geronimo-jms_1.1_spec-1.1.1.jar  
  • hawtbuf-1.9.jar
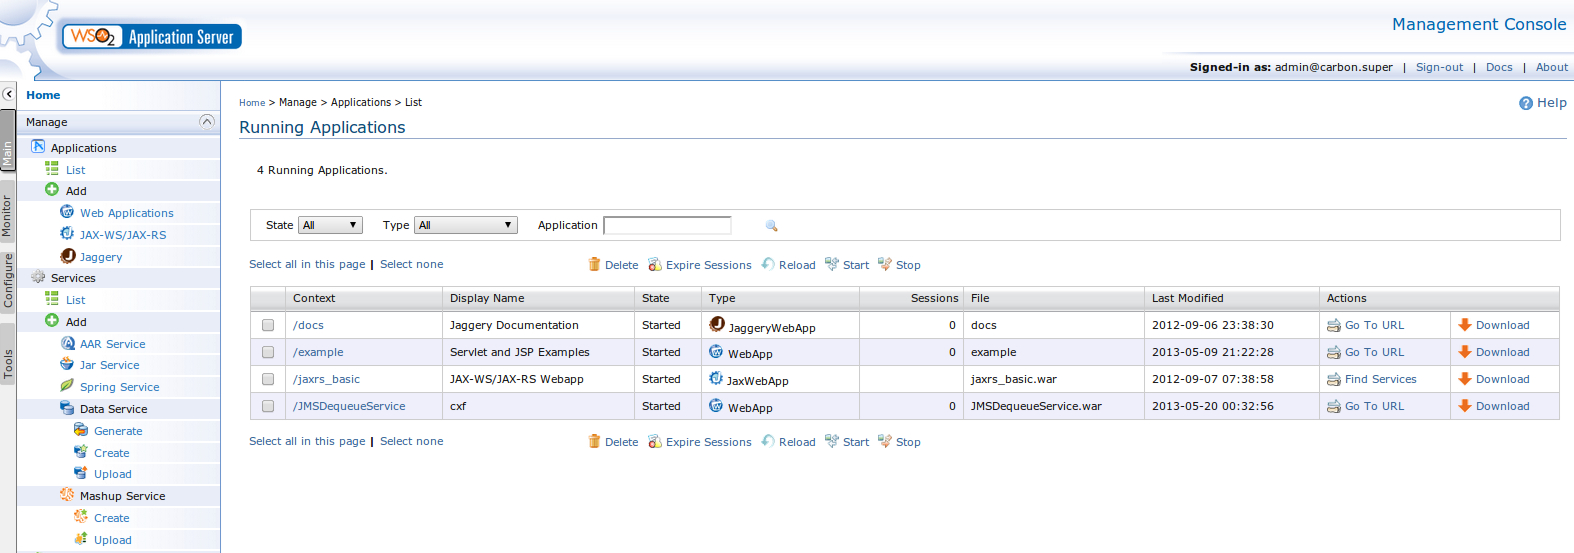
Now log into WSO2 Application Management console on default URL https://localhost:9443/carbon and using the default username and passwords admin, admin. Then add the web application we just created. It will take 2-5 seconds and then it will appear on the deployed web application list as below.


Now the dequeuing JAX-RS service is ready to use. When you send a http GET request  to http://localhost:9768/JMSDequeueService/services/dequeue_service/dequeue/SampleStockQuoteProvider , you will get the top message of the queue, SampleStockQuoteProvider.


Friday, May 17, 2013

Dequeue from a JMS queue and send as a SOAP message using WSO2 ESB

When you providing a solution for a enterprise you may need to dequeue from a JMS queue and send it to a SOAP endpoint. For this solution the service operation we going to invoke should be one way. So here I am explaining how you can do that easily using WSO2 ESB. Its all about a matter of creating a proxy service. You can download WSO2 ESB from here.


Before starting the WSO2 ESB you need to enable the JMS listener by setting the configuration details of JMSListener in $WSO2ESB_HOME/repository/conf/axis2/axis2.xml. WSO2 ESB supports most of the JMS message brokers and its a just a matter of simple configuration. Here are some configuration document links.

Start the WSO2 ESB using executing the following command using command line inside $WSO2ESB_HOME/bin.
  • Windows - wso2server.bat 
  • Linux - sh wso2server.sh
Now lest see a short diagram of what we are going to do.

Here red lines show the message flow. 

Now lets see how to create the proxy service to achieve this functionality. First go to WSO2 ESB Management Console which you can access using the URL https://localhost:9443/carbon which is the default URL.  
Now you need to login to the Management Console and the default username and password are admin and admin.

Now select the Main ==> Manage ==> Services ==> Add Proxy Service ==> Custom Proxy as shown in the figure below.


In the first page of the proxy configuration add a Proxy name, set the transport to jms and add the following Service Parameters categorize under General Settings.

  transport.jms.ContentType : 
      <rules>         
         <jmsProperty>contentType</jmsProperty>         
         <default>application/xml</default>      
      </rules>
   transport.jms.ConcurrentConsumers : 1
   transport.jms.ConnectionFactory : myTopicConnectionFactory
   transport.jms.SessionTransacted : false
   transport.jms.Destination : myQueue
   transport.jms.MaxConcurrentConsumers : 1

You can find more details for these parameters on here.

After filling the page will look like as following figure.


Now you are done with the first page. Click Next to go to the next page.

Here you need to configure the inSequence to send the SOAP message to your service endpoint. Here we are going to add it in line. Click Edit in Define Inline in Define In Sequence.

And add a Log mediator. You can do it by click on Add Child ==> Core ==> Log and set to log level to full. Which will log the messages comes to this Proxy endpoint.

Then add the Send mediator where we invoke the endpoint of our service. This can be done by clicking  Add Child ==> Core ==> Send. Then edit the Send mediator configuration by defining the In Line endpoint and selecting address endpoint and add your service endpoint there.

Now it will be look like as following figure.


Save and Close the In sequence, then click Next.
Then click Finish and we are done with the configuration.

So if we add a message to the myQueue, then this proxy will dequeue it from the queue and send it to your endpoint. 

Here is my full configuration in xml format and my service endpoint is http://localhost:7611/sample/ep1

<proxy xmlns="http://ws.apache.org/ns/synapse" name="jmsReaderProxy" transports="jms" statistics="disable" trace="disable" startOnLoad="true">
   <target>
      <inSequence>
         <log level="full"/>
         <send>
            <endpoint>
               <address uri="http://localhost:7611/sample/ep1"/>
            </endpoint>
         </send>
      </inSequence>
   </target>
   <parameter name="transport.jms.ContentType">
      <rules>         
         <jmsProperty>contentType</jmsProperty>         
         <default>application/xml</default>      
      </rules>
   </parameter>
   <parameter name="transport.jms.ConcurrentConsumers">1</parameter>
   <parameter name="transport.jms.ConnectionFactory">myTopicConnectionFactory</parameter>
   <parameter name="transport.jms.SessionTransacted">false</parameter>
   <parameter name="transport.jms.Destination">myQueue</parameter>
   <parameter name="transport.jms.MaxConcurrentConsumers">1</parameter>
   <description></description>
</proxy>